About Me

I'm just a veterinary student sharing my craft projects! It's nice to push studying aside and do something creative once in a while!

Tuesday, June 11, 2013

Weathered Wooden Sign

Finally I start my summer internship at a pathology lab tomorrow. With "free" summer time coming to a close, I just barely fit in the finishing touches on project #3. I got the idea for this sign this past February after seeing one with different words. A couple of weeks ago I was inspired by this blog to try a weathered wooden look. I am very pleased with the way it turned out! Hope you like it!

The Finished Product:


What will you need?
- Old wood scraps
- Sanding block and sand paper (60 and 120 grit)
- Wood filler
- Wood stain
- Paint brush and paint stirrer
- White (or any color) spray paint
- Small finishing nails (1 1/4")
- 2 eye hooks
- Wire
- Acrylic paint and a small paint brush
- Printer
- A clear coat spray paint sealer

Step #1: Find your wood and cut it to size. I used old scraps my dad had lying around. The front pieces of the sign are 2 1/2" x 5/8" and I cut each of them to an 18" length. The two pieces on the back of the sign are 1" x 1" and I cut each of them to a 16 1/4" length. 

Step #2: Sand, sand, and sand some more with coarse sand paper. Some of these scraps were extra crappy and a few had mold which isn't ideal. Make sure when you are sanding your old wood you wear a mask; no project is worth inhaling mold spores that may be released from the wood during sanding. I used 60 grit to go over all pieces until they were a normal wood color with no marks or dirt. With 60 grit make sure you sand with the grain of the wood, because you will notice if you go against the grain. 

Here is the wood post-60 grit:

Step #3: Blemish fixing. If there are any spots on the wood that you absolutely cannot live with, now is the time to fill. I had two extra-ugly knots that I filled with an Elmer's wood filler that is stainable. Follow the directions on your wood filler for application and drying time! 

 So ugly!!


At least that's a little better!

Step #4: Sand again. This time with a finer grit, 120. This will make the wood very smooth and will take off the excess wood filler from the filling process. 

Step #5: Staining time! I used Minwax dark walnut. It came out fairly dark which I liked for the weathered feel. I know some of the wood stained a little lighter, but my whole goal was to have a somewhat banged-up looking final project so I just did the one coat. Follow the directions on your stain for application and drying!


Step #6: Spray paint your sides. I lined all of my wood pieces up on edge and spray painted the edges. Once the sign is put together, getting spray paint into these spaces will be very difficult so I just did them before I put it together!


 Step #7: Hammer time! No really, time to assemble! I laid the whole project on a towel in order to protect the front of the sign since the pine I used is so easy to dent. First I put an eye hook into each back piece of wood so that I could attach a wire at the end of the project to use for hanging. Then I used 1 1/4' finishing nails to put on the two back pieces of wood, leaving ~1/4" between each slat. I put 2 nails on each side. 


 The back all finished!


A close-up of the eye hook

And the front all finished!

Step #8: Spray paint the entire thing! Two coats, front and back!


Step #9: Sanding, again! I used 120 grit to go over the front of the sign until I got it to the desired look. Go with the grain! To get the edges of each slat, I ran a piece of sand paper between the openings and ran it back and forth over the edge. As far as the back of the sign goes, I went with the grain on the two back pieces but then gave up and just sanded the rest however I felt easiest. 


Step #10: Add your wire. I used one I found in the basement. Any wire will do so long as its sturdy enough to be used for hanging. 

Step #11: Lettering. This was by far the trickiest part because I really didn't want to purchase stencils. Instead I printed out the words from my computer. I used MV Boli bolded font at size 190 (what?!) with a 5pt spacing between the letters. Next I cut out the words, flipped them over and traced their outline on the back of the paper. Now when you place the words over the sign and trace the outline it will press the pencil from the back onto the sign. Once I had all of the lettering traced on the sign I painted the letters on using Americana "Burnt Umber" acrylic paint. 


Step #11: Finally add a clear coat of spray paint to seal everything over and give the piece a bit of gloss! It doesn't really show in this photo but it certainly does in real life!


All done! Hope you liked it!

Thursday, June 6, 2013

Reversible Cotton Tote Bag with Rope Handles

It's summer!! That means there is now time for ALL the craft projects!! Yesterday I was on Pinterest (surprise surprise!) and found a link for an adorable tote bag made by a blog called MADE. I LOVED the bag so much, and it looks super durable and super cute. Alas, I am still a student and I don't have money to get all the nice fabric that they used in the blog. What I did have was an old T-shirt and some fabric scraps in my mom's basement. Yes! Enough things to make a bag with!!


Here is the finished product! 
One side is pink, and one side is a vintage-ish floral print. 


Now there's one thing you should know about me before you continue through this post. I am BY NO MEANS a sewer. In fact, I usually break the sewing machine every time I try to use it. It's a wonder it didn't jam up on me last night. As you can see there's a little bit of a boo-boo on the pink side of the bag, but I'm okay with it since I know I'm a terrible sewer anyway. Alright, that's out of the way, so let's get started!

Step #1: Get yourself some fabrics (2 sets), iron them, and measure out your bag. I decided to do 14" by 15". I know 15" seems a little tall, but don't forget that you're going to make it a little flat on the bottom so it will look shorter. You will need 2 pieces 14"x15" for each bag. I used an old T-shirt and some old cotton fabric I found lying around. Turn the t-shirt inside out and make sure you're drawing on the wrong side. Same goes for the fabric. 


Now do this again on your second fabric (for me the vintage floral print). When it's all said and done, you should have 2 pieces of each type of fabric measured out. 

A tip for next time: I kind-of winged the measuring. I'm not sure both of my pieces were perfect rectangles. Next time It would probably be best to measure based on margins and cut the 2 pieces of fabric out together so that they are exactly the same size and shape. 


Step #2: Put in some pins! I put pins on either side and along what will be the bottom of the bag as that's where I'll be sewing for now. Leave the top of the bag open. 


 Step #3: Sew along your pins. This will put together the 2 sides of each bag as well as the bottom. I used white multi-purpose thread for both sewing and for the bobbin. 

Step #4: Make your corners. Measure 2" in from the bottom and the sides to make a diagonal line. Do this on the bottom corners of both bags. 

Step #5. Sew along your lines and snip off the corners. When you're all finished the corners should look like this!

Step #6: Awesome! Now get ready to flip over the top edge of each bag. Fold the right side of the fabric over and iron a crease into it. Then go ahead to the sewing machine and put in  a line of stitches 1/4" from the top of the bag. 
The floral patterned bag folded over and ironed. 

The pink bag folded over with a line of stitches!

Step #7: Flip one of the bags right side out and put them together. Make sure when you are putting one bag into another that the wrong side of the fabrics are facing eachother. 


Step #8: The tricky part! Originally I wanted to put in rope handles that went all the way down to the bottom. Turns out I didn't have enough rope left from a coaster project that I did. Instead I decided it would still be functional to run a braided rope handle through the top of the bag. To do this, I measured 3.5" from each side seam toward the center of the top of the bag. These 3.5" marks will be where the braided handle comes out. Throw some pins in to make sure the two fabrics stay together. I sewed from each 3.5 mark to the other on both sides of the bag. Then I sewed between the 3.5" marks in the center of the top of the bag remembering to leave a 1" space to allow the rope handle to leave the bag (where my finger is in the photo). 

Step #9: Now that you have the top row of stitches in, you're almost done! Next I put in another row of stitches ~1" below the top row. This row can be continuous, so no more measuring! I totally eyeballed the 1" difference, and it ended up working fine. Once you've thrown that row of stitches in, your top should look like this:

Step #10: Time for the Handle. I used a cotton clothesline for the "rope" that made the handle. The clothesline comes as a roll of 100 ft for only ~$3.84 at the Wal-Mart. I cut three strands of probably 3-4" (you can make than handles as long as you like) and simply braided them together. 


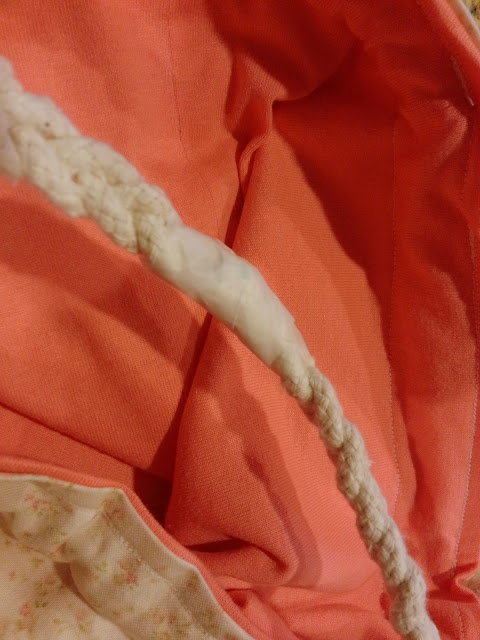
Step #11: I wrapped one end of the rope in scotch tape so I could run it through the bag. I ran the rope through the 7" tunnels I made passing through the side seems. Hard to explain, I guess, but you can get the idea from looking at the photo below!

Step #12: Stitch the ends of the rope together. I admit I am REALLY bad at stitching rope together. But it doesn't matter because it's going to be hidden! I used the same multi-purpose white thread to stitch the 2 ends of the rope together. Then I just wrapped the monstrosity in scotch tape to make it easier to slip into one of the fabric tunnels to hide it. 


Alright! All finished!!


Hope this was helpful! Thanks to the MADE blog for inspiring me!!